Solar Thermal - Roof Entries
To those that have never installed solar thermal, the actual method of putting pipework through a roof without it leaking afterwards may be a bit of a mystery!
The first thing to bear in mind is that solar thermal pipework can get very hot indeed, and any seals or roofing product used must be rated for high temperature. Another consideration is the roof type - generally this will be slates or tiles and 'kits' are available for both.
Keeping the roof weather tight just means following a few simple rules. Water doesn't often flow uphill - unless by capillary action (a suction caused in very small spaces, it's how plants and trees take up water). The best way of using gravity to your advantage is to make any pipe entries slightly above the the connections to the solar thermal collector. If you do this your pipework is running uphill to the roof entry. This point is often overlooked by installers as it doesn't look as neat as a level roof entry. If you are running pipes downhill from the collector to the roof entry then water will 'track' down the pipework and into the loft space.
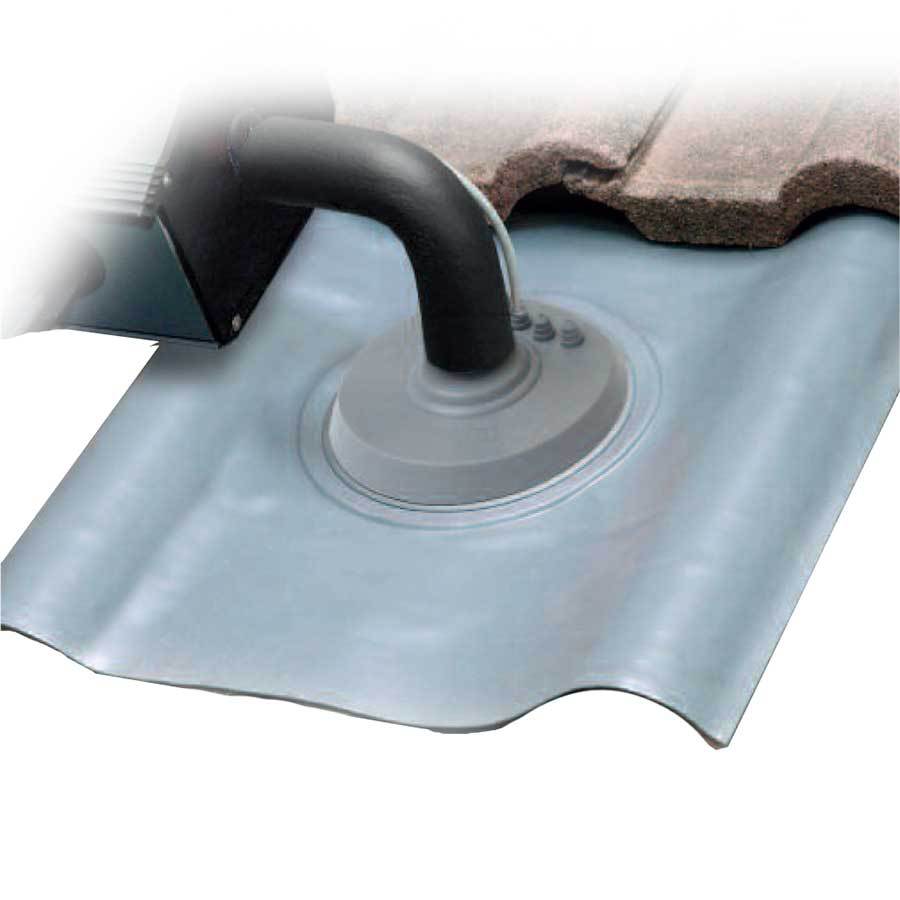
Working our way back from the collector we now need to look carefully at the hole to get the pipes through the roof covering. By far the simplest method is to use a 'flashing kit' this will replace a slate or tile and is composed of lead or aluminium with a silicone 'boot' in the center. The kit is a little larger than the slate or tile that it is designed to replace and will sit under the other slates or tiles when fitted. Depending on the roof type some sections of tile or slate will need to be removed to allow the silicon part to stand proud of the roof surface. This is very important as the silicon will naturally invert into a funnel shape when the pipework is pushed through and this must be corrected.
The silicon itself must be cut to allow a hole for the pipework to pass through. This can be done with scissors but care must be taken to cut parallel to the marks on the 'boot' itself. If the cut is rough or there is a 'nick' in it then a split will spread downwards and the assembly will leak. Trim off a section below the nick to stop it spreading.
Sliding the insulation over the pipe before the connections are made is the most efficient method of insulation. Care should be taken to leave a gap of 'naked' pipework to pass through the silicon and to re-establish the insulation on the inside of the loft behind the silicon boot. Pushing the insulation through the silicon section can cause a split and will cause leakage.
To be 'doubly sure' loop the pipework downwards then up towards the connections to form a 'drip loop'. This provides a route for water to flow away from the roof entry. The final stage is to connect the pipework and replace the tiles or slates so that as mentioned previously the silicon section stands proud of the roof surface (or at least is not inverted into a funnel shape!)
So now you may look again at solar thermal installations with 'loopy' pipework on the roof and know the reason why!
We have a great range of solutions to provide you with the all the power you need!
From flexible PV panels for caravans & boats to a large range of charge controllers, inverters and batteries.


Need help with Off Grid specification or design? Download our Off-Grid Sizing tool or contact us and we can tailor a quote for your individual off grid needs
Find us on social media
remotepoweruk
Follow us on:
